| << PageStream Extensions | Borders >> |
| Top: Documentation Library | Up: PageStream Extensions |
TextFX
Current version: 2
For PageStream 3.1 and newer. Included in PageStream5.0 Pro
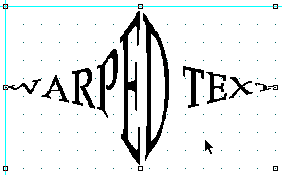
TextFX lets you warp text into shapes, as well as curve it around paths. Additionally, it lets you convert text to paths so that you can reshape it with PageStream's drawing tools. A quick look at the examples below will convince you that this extension is a must for anyone serious about DTP. TextFX can really make your titles grow out of the ordinary!


 Using TextFX
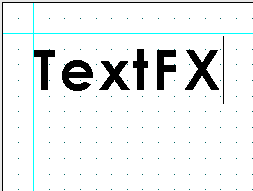
Using TextFX is extremely simple. Basically, you create a text block by typing directly on the page with the ''Text'' tool, then you select the text block with the ''Object'' tool and apply a TextFX shape or curve to it. PageStream will warp or curve the text accordingly.1. Create a text block.
Select the ''Text'' tool, click on the page and start typing to create a text block.
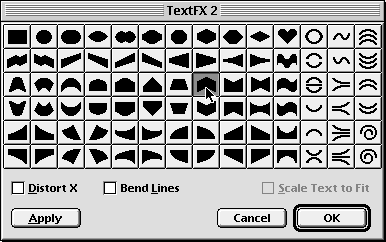
2. Select the shape or curve you want to apply to the text.
Select the ''Object'' tool and click on the text block to select it. After doing this, click on the ''FX'' button in the ''Edit Palette'' below the document window. (If the ''Edit Palette'' is not currently visible, choose ''Show Edit Palette'' in the ''Window'' menu.)
The ''TextFX'' dialog box will appear. Choose the shape or curve that you want to apply to the text.
For extra quality, you can check ''Bend Lines'', but this will require extra processing time.
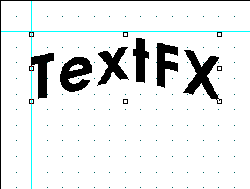
3. Click on ''OK'' to apply the selected shape to the text block.


 Extra options
''Bend Lines'': This option will generate text effects of a much higher quality, but at the expense of longer processing times. It is highly recommended to toggle this option on, unless you have a very slow processor such as a 68020.
''Distort X'': This option will distort the shape differently. You can check or uncheck this box for different effects. Depending on the shape selected, it may be already checked or not. The default setting should give satisfactory results.
''Scale Text to Fit'': This option is ghosted if a shape is selected. It becomes available when a curve is selected from one of the last three columns. Choose this option if you want the text to automatically be scaled to fit in the curve. Otherwise, some text might either be clipped or take only part of the curve's length.

 Text on curves
For most of the curve icons located in the last three columns, you may only curve the text contained in the first line of the text blocks. If the text block contains more than one line, the extra lines will not be shown in the TextFX object. They will still be stored in memory, so if you change the TextFX object back to a regular text block, they will still be there.Some curve icons require a text block of two or three lines. If the text block contains more lines than the required number, the extra lines will not be shown. Examples of such icons are shown below.


 Warping text in custom shapes
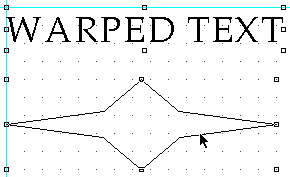
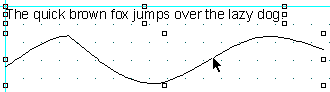
You can warp text inside any shape you can draw with PageStream's drawing tools. The instructions for doing this follow:1. Select the text block and the shape.
2. Select the ''Warp Text script'' from the ''Scripts'' menu.
The text block will be warped inside the selected shape.
Note: In this screenshot, the new shape was doubled vertically to make the left and right edges clearer.
 Curving text around custom curves
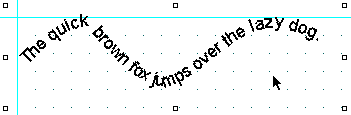
You can also curve text around any path you can draw with PageStream's drawing tools. Instructions for doing so follow:1. Select the text block and the curve.
2. Select the ''Curve Text script'' from the ''Script'' menu.
The text will be curved around the path selected.
Note: In this screenshot, the new shape was resized larger to make it clearer. Try this with smooth curves for the best results.
 Converting text to paths
With this extension installed, you will be able to convert text to paths. Paths can be moved and resized much faster than TextFX objects, but you will no longer be able to edit the text inside the text block, nor will you be able to apply another TextFX shape to it.To convert a text block or TextFX object to a path: Select the text block or TextFX object and choose the ''Convert to Path'' command from the ''Object'' menu.
 | You can add a special touch to your titles with TextFX, the ''Convert to Path'' command and the ''Mask'' feature. Select a text block, position it over a bitmapped graphic and choose ''Mask Graphic'' from the ''Mask'' submenu of the ''Object'' menu to create a textured title. |
Turning TextFX objects back to ordinary text blocks
1. Select the TextFX object with the ''Object'' tool.
2. Click on the ''FX'' button of the ''Edit Palette''.This will open the ''TextFX'' dialog box. (If the ''Edit Palette'' is not currently visible, choose ''Show Edit Palette'' in the ''Window'' menu.)
3. Choose the ''Rectangle'' button (the first one of the first line) and click on ''OK''.The TextFX object will be turned back to an editable text block once again. Note that this will not work if the TextFX object has been converted to paths.


TextFX Sub-Section url:PGSuser/extensions#anchor1148458
created:2006-04-18 12:06:34 last updated:2006-08-12 21:59:11
Copyright © 1985-2026 GrasshopperLLC. All Rights Reserved.
| User Contributed Comments For TextFX | sign in to add a comment |
| There are no user contributed comments for this page. | |
| << PageStream Extensions | Borders >> |
| Top: Documentation Library | Up: PageStream Extensions |