| << Printing on a Desktop Printer | Printing Proofs >> |
| Top: Documentation Library | Up: Printing on a Desktop Printer |
To Print on a Desktop Printer
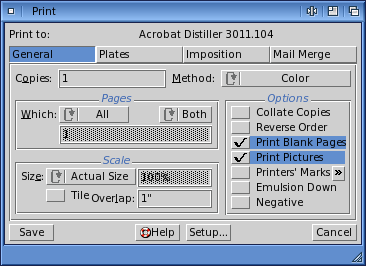
1. Choose ''Print'' from the ''File'' menu.
The ''Print'' dialog box will open to allow you to choose a variety of printing options. If you did not configure your printer before choosing ''Print'', click ''Setup'' now to access the ''Print Setup'' dialog box.
2. Set the number of copies.
Enter the number of copies to print into the ''Copies'' text box.
3. Set which pages to print.
The ''Which'' pop-up menu controls which pages will be printed. Choose ''All'' to print all the pages in the document, ''Chapter'' to print all the pages in the current chapter, ''Page'' to print just the current page, or ''Range'' to print a range of pages. When you print a range, enter the starting page number, a dash, then the ending page number. You can print discontinuous page ranges by separating them with a comma, or a single page by entering just that page number.
4. Choose how to print the page.
Choose ''Grayscale'' from the ''Method'' pop-up menu for black and white printers and ''Color'' for color printers.
5. Click ''Prin''t.
 Printers' marks
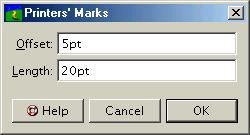
Crop marks, registration marks, slur gauges, density control bars, gray balance patches, trapping patches and page information are referred together as printers' marks. You can toggle on printers' marks in the ''Print'' dialog box, but only crop and registration marks will print to non-PostScript.The length of the crop marks and their stand off from the defined outer edge of the paper may be changed by choosing the browse button to the right of the ''Printers' Marks'' checkbox.
- Crop marks: Lines at the page corners. These aid in trimming the page to its final size.
- Registration marks: Bulls-eyes at the top and bottom. These are used by commercial printers to align color separations correctly.
- Density control bar: Swatches in 10% increments. These are used to verify that the inks are printing at the correct density. Separate control bars will be printed for each plate at the bottom right. (PostScript only)
- Gray balance patch: Two swatches above the density. This is used to ensure proper midtone color balance. The dot control bars percentages are 50% cyan, 41% magenta and 41% yellow. Compare the gray balance patch to the 50% gray patch to its right. (PostScript only, color and process separations only)
- Trapping patches: Swatches above the gray patch. These are used to evaluate the ink acceptance in wet-on-wet printing when multiple inks are printed simultaneously. (PostScript only, color and process separations only)
- Slur gauges: Targets in upper right and bottom left. These are used to ensure that the press pressure is set correctly. Slur gauges fill in if the pressure is too great. They can also be used as a second set of registration marks. (PostScript only)
- Page slug: Text at the bottom left. The first line lists the project filename, page number and date. The second line contains the separation (ink) name, screen frequency, angle and scale. (PostScript only)
By default, ''Printers' Marks'' require an extra 0.5" (12.7mm) on each side of the page. A letter size (8.5 x 11") page requires 9.5 x 12" to print. Changes to the ''Offset'' and ''Length'' values will increase or decrease that requirement. The ''Offset'' will define the region commonly refered to as the bleed, where objects may extend beyond the logical edge of the paper. Minor variations in the paper feed and cutting require objects that are to extend to the very edge of the paper must actually extend beyond the edge of the paper and be prepared to be cut in a range depended on the accuracy of the physical print method.
If the ''Printers' Marks'' cause the page to be too big for printing drafts on the paper in your printer, print at a reduced scale or in tiles.
To Print on a Desktop Printer Sub-Section url:PGSuser/desktopprint#anchor1791834
created:2006-04-18 11:09:55 last updated:2006-09-19 15:10:21
Copyright © 1985-2026 GrasshopperLLC. All Rights Reserved.
| User Contributed Comments For To Print on a Desktop Printer | sign in to add a comment |
| There are no user contributed comments for this page. | |
| << Printing on a Desktop Printer | Printing Proofs >> |
| Top: Documentation Library | Up: Printing on a Desktop Printer |


