| << Print Setup | Setting up a non-PostScript Printer >> |
| Top: Documentation Library | Up: Print Setup |
Setting up a PostScript Printer
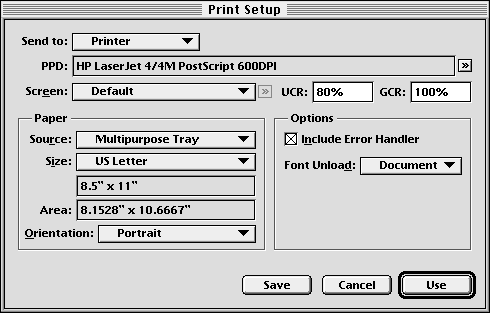
1. Choose ''Print Setup'' from the ''File'' menu.
The ''Print Setup'' dialog box will appear.
For Windows, the standard Windows PostScript print setup dialog box will appear. Follow the instructions that came with your computer or printer to configure for your specific PostScript printer. To print to a disk file, choose Printers from the Settings menu in the Start menu. Select Properities for the printer to set various advance settings including output device.
2. Select the custom PostScript printer driver.
Choose ''<<PostScript>>'' from the ''Type'' pop-up menu.
3. Select the PPD file for your printer.
Click the ''Browse'' button to the right of the ''PPD'' text box. A file selector will open from which you can choose the PPD (PostScript Printer Description) file that matches your printer model.
4. Choose the optimized screen.
Choose ''Default'' unless you want to specify a screen frequency. Depending on the PPD file you select, there may be more than one choice in the ''Screen'' pop-up menu or none at all. You can override the optimized screen values for each page or plate in the ''Plate Control'' dialog box. If you wish to specify a custom screen frequency, choose ''Custom'' from the ''Screen'' pop-up menu and click its ''Browse'' button to enter the angle and frequency for each plate.
5. Select the destination.
Choose ''Printer'' to direct output to a Linux, MacOS, or Windows printer. On AmigaOS computers, choose ''PAR:'' for printers connected to the parallel port, ''SER:'' for printers connected to the serial port, or ''Device'' for printers using a different device.
Choose ''Disk File'' to direct the output to a file so that it can be printed later or on another computer. Choose ''EPS Disk File'' to direct output to an Encapsulated PostScript File so that the page can be imported into another program.
6. Set the paper options.
''Source'': The options will vary depending on the PPD file selected, but most printers have a paper cassette and allow manual feeding.''Size'': Select the paper size from those available for your printer. The ''Area'' text box will show the maximum imageable area for the paper size selected. If the size you are using is not listed, choose ''Custom'' and enter its dimensions into the ''Horz'' and ''Vert'' text boxes.
''Orientation'': Choose ''Portrait'' (vertical) or ''Landscape'' (horizontal). This is the orientation of the paper in the printer and does not reflect the orientation of the page. PageStream will automatically orient your page to best fit the paper.
7. Click ''Save'' or ''Use''.
Choose ''Save'' to make the settings permanent, or ''Use'' to change them for this session.
 PPD files
PostScript Printer Description files provide your PostScript printer's specifications to PageStream so that it can offer you its extra options. PPD files contain a list of fonts resident in the printer, its pre-defined paper sizes, the resolutions it can print, and its optimized screens for color separations. PageStream assumes that your printer matches the selected PPD file.PPD files are ASCII text files and are identical on all platforms. Printers normally come with a PPD file. If your printer did not include a PPD file, contact your printer manufacturer. PPD files are normally stored in the System:Extensions:Printer Descriptions directory on MacOS computers, and in the SoftLogik:Printers/PPD directory on AmigaOS computers. PPD files can also be found online at http://www.cups.org/ppd.php.
If a PPD file is not available for your printer model, the General PPD file can be used for most PostScript printers with the standard 35 fonts. Do not substitute PPD files for imagesetters; always use the PPD file matching the imagesetter.
Setting up a PostScript Printer Sub-Section url:PGSuser/printsetup#anchor805708
created:2006-04-18 09:29:23 last updated:2008-11-13 17:02:13
Copyright © 1985-2026 GrasshopperLLC. All Rights Reserved.
| User Contributed Comments For Setting up a PostScript Printer | sign in to add a comment |
| Tim Doty wrote... | 2008-07-04 14:58:44 |
Some printers have a broken postscript implementation (Brother HL-4070 CDW, for example) that ignores the "Font Unload" directive. For these printers it is important to not change the setting. That is, leave "Font Unload" set to "Document". Setting it to "Page" has the unexpected result of using up printer memory because it fails to unload the fonts and PageStream is providing the font information again for each page. When attempting to print a font catalog to such a printer it is necessary to send each page as a separate print job to avoid overflowing memory. | |
| User Contributed Comments For Setting up a PostScript Printer | sign in to add a comment |
| << Print Setup | Setting up a non-PostScript Printer >> |
| Top: Documentation Library | Up: Print Setup |

