| << Creating Text Frames | Creating Text Blocks >> |
| Top: Documentation Library | Up: Putting Text on the Page |
Text Frame Options

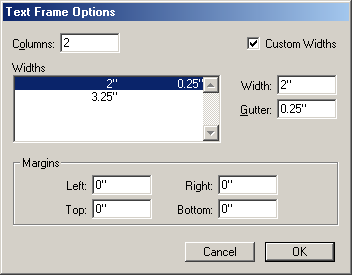
To change the number of columns in a text frame after creating it: Select the frame with the ''Object'' tool. Choose ''Text Frame Options'' from the ''Fram''e submenu in the ''Object'' menu to display the ''Text Frame Options'' dialog box. Ticking the ''Custom Widths'' box will show each of the column widths in the ''Widths'' list. Clicking on one of the widths will show the current values in the ''Width'' and ''Gutter'' text boxes which can be changed to custom values. Changing the number of columns in the ''Column'' text box will change the number of columns appearing in the ''Widths'' selector box.
Alternatively, enter new values into the ''Edit'' palette's ''#C'' and ''G'' text boxes for text column frames to set the columns to equal widths.
To change the text margin inside the text frame: Select the frame with the ''Object'' tool. Choose ''Text Frame Options'' from the ''Frame'' submenu in the ''Object'' menu to display the ''Text Frame Options'' dialog box. Enter the left, right, top and bottom margin to leave between the edge of the frame and the inside frame for text. Note: This option only works for rectangular text frames.
Text Frame Options Sub-Section url:PGSuser/puttingtext#textframeoptions
created:2006-04-14 18:24:16 last updated:2006-07-06 21:07:50
Copyright © 1985-2026 GrasshopperLLC. All Rights Reserved.
| User Contributed Comments For Text Frame Options | sign in to add a comment |
| There are no user contributed comments for this page. | |
| << Creating Text Frames | Creating Text Blocks >> |
| Top: Documentation Library | Up: Putting Text on the Page |

