| << Changing measurement systems | Guides and the Grid >> |
| Top: Documentation Library | Up: Rulers and Measurements |
Changing the rulers
The rulers normally display the horizontal and vertical measurement systems, but you can override the ruler defaults in a window.
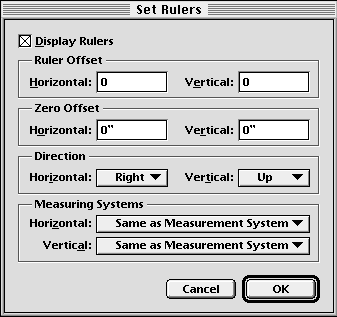
To set the rulers' measurement systems: Choose ''Set Rulers'' from the ''Layout'' menu to display the ''Set Rulers'' dialog box. If you want to use the default measurement systems, select ''Same As Measurement System'' from the horizontal and vertical pop-up menus. Otherwise select their measurement systems. Click ''OK''.
You can override the measurement system when entering a number in a text box by adding an abbreviation. PageStream shows values with an abbreviation so that you know which measurement system is in use.
To override the measurement system in a text box: Enter the number with its measurement system abbreviation.
- Inches: " or i after the number.
Example: 1.25" or 1.25i for 1.25 inches - Centimeters: cm after the number
Example: 3cm for 3 centimeters - Millimeters: mm after the number
Example: 30mm for 30 millimeters - Picas: p after the number
Example: 5p for 5 picas - Points: p before or pt after the number
Example: p3 or 3pt for 3 points - Picas and points: p between the numbers
Example: 5p3 for 5 picas and 3 points - Printer picas: pp after the number
Example: 5pp for 5 printer picas - Printer points: pp before or ppt after the number
Example: pp3 or 3ppt for 3 printer points - Printer picas and points: pp between the numbers
Example: 5pp3 for 5 printer picas and 3 points - Ciceros: c after the number
Example: 4c for 4 ciceros - Ciceros and didot points: c between the numbers
Example: 4c3 for 4 ciceros and 3 didot points - Didot points: c before or d after the number
Example: c3 or 3d for 3 didot points - Feet: ' or f after the number
Example: 2' or 2f for 2 feet - Meters: m after the number
Example: 2m for 2 meters
 Setting the zero point
The zero point is the intersection of the origins of the horizontal and vertical rulers. The zero point defaults to the top left corner of the page. You can move the zero point to measure distances from any point on your page.You can set the ruler zero point visually by dragging out from the ruler origin while holding down the Control key.
Click on the ruler origin while holding down the Control key to reset the zero point to the top left corner of the page or spread .
Alternatively, choose ''Set Rulers'' from the ''Layout'' menu to display the ''Set Rulers'' dialog box. Enter the zero point offset from the top left corner of the page or spread. Click ''OK''.
 | Do not forget to hold down the Control key before dragging out from the ruler origin. If you don't, you will create one or two page guides instead of moving the zero point. Dragging out guides visually. |
 Moving the rulers
The rulers are positioned at the top left corner of the window by default. You can move the rulers to place them in a different corner or near objects you wish to measure visually.You can set the ruler offset visually by Shift dragging out from the ruler origin.
Shift click on the ruler origin to return the ruler to the top left corner of the window.
Alternatively, choose ''Set Rulers'' from the ''Layout'' menu. Enter an offset in pixels for the rulers from the top left corner of the window. Click ''OK''.
Changing the rulers Sub-Section url:PGSuser/rulers#anchor865941
created:2006-04-14 15:39:41 last updated:2019-12-19 20:08:41
Copyright © 1985-2026 GrasshopperLLC. All Rights Reserved.
| User Contributed Comments For Changing the rulers | sign in to add a comment |
| There are no user contributed comments for this page. | |
| << Changing measurement systems | Guides and the Grid >> |
| Top: Documentation Library | Up: Rulers and Measurements |

