| << Step 12: Closing and opening documents | Step 14: Printing the document >> |
| Top: Documentation Library | Up: Lesson 1: Creating a Letterhead |
Step 13: Importing text
If you cannot see the entire page in the window, choose ''Full Page'' from the ''View'' pop-up menu. In this exercise, you will import text created in a word processor into the text frame created in step 10. The text is stored in Rich Text Format (RTF), which is a standard format for exchanging text between applications.
Click in the text frame. The insertion point will appear at the top left corner of the frame.
2. Choose ''Insert Text'' from the ''File'' menu.
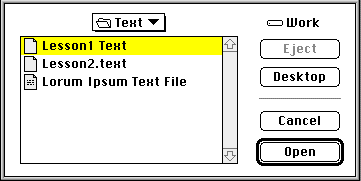
The ''Insert Text'' file selector will appear. Select Lesson1 Text from the Text folder in the PageStream directory. Click ''Open''. Note: If you don't see this file, you may not be in the correct folder.
3. Click ''Insert'' in the ''Insert Text'' dialog box.
A status dialog box will appear to show the progress. When it disappears, the text will appear in the text frame. If ''Select on Paste'' in the ''Files'' panel of ''Preferences'' is selected the text will be selected, so simply click anywhere in the text frame to deselect it.
4. Choose ''Save'' from the ''File'' menu.
The ''Save'' file selector will appear. Enter Lesson1 Letter as the name. You should not use an existing file name such as Lesson1 because that would overwrite the original file.
Step 13: Importing text Sub-Section url:PGSuser/lesson1#step13
created:2006-04-14 13:55:30 last updated:2019-12-19 16:55:16
Copyright © 1985-2026 GrasshopperLLC. All Rights Reserved.
| User Contributed Comments For Step 13: Importing text | sign in to add a comment |
| There are no user contributed comments for this page. | |
| << Step 12: Closing and opening documents | Step 14: Printing the document >> |
| Top: Documentation Library | Up: Lesson 1: Creating a Letterhead |


