| << Step 9: Setting text attributes | Step 11: Saving as a template >> |
| Top: Documentation Library | Up: Lesson 1: Creating a Letterhead |
Step 10: Creating a text column frame
The last step to make the letterhead is to create a text frame to hold the body text for letters. You may want to decrease the view magnification so you can see the whole page, so choose ''Full Page'' from the document window's ''View'' pop-up menu now.
1. Choose ''Create Text Frames'' from the ''Layout'' menu.
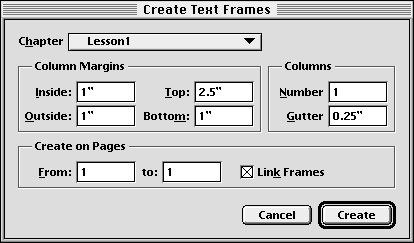
The ''Create Text Frames'' dialog box will appear.
2. Click ''Create''.
You don't need to select any options in this dialog box. Because you set the margin and column guides properly in step 1, creating a text frame is as simple as opening this dialog box and clicking on ''Create''.
Hint for Advanced Users: If following pages in multi-page letters were to use a blank page instead of this letterhead, it would be advisable to create a second master page using the ''Document palette''. The second master page could have a top margin of 1", and text frames could then be created on it easily.
Step 10: Creating a text column frame Sub-Section url:PGSuser/lesson1#step10
created:2006-04-14 13:55:29 last updated:2019-12-19 19:12:48
Copyright © 1985-2025 GrasshopperLLC. All Rights Reserved.
| User Contributed Comments For Step 10: Creating a text column frame | sign in to add a comment |
| There are no user contributed comments for this page. | |
| << Step 9: Setting text attributes | Step 11: Saving as a template >> |
| Top: Documentation Library | Up: Lesson 1: Creating a Letterhead |

